 Haiku-приложения для командной строки
| Расположение в Tracker: | /boot/system/bin/ /boot/system/non-packaged/bin/ ~/config/bin/ ~/config/non-packaged/bin/ |
All commandline applications shipped with Haiku are in /boot/system/bin/. Your own or additionally installed commandline apps will appear there as well, or in ~/config/bin/, when installed from a .hpkg package. Otherwise you can put them into /boot/system/non-packaged/bin/ or ~/config/non-packaged/bin/. All these locations are part of the PATH variable and are therefore automatically found.
The following isn't an exhaustive list of all Haiku-specific CLI apps, it serves just to highlight a few of the most useful to give you a taste. Feel encouraged to explore what's in the bin/ folders on your own a bit. Executing an app with the parameter --help shows the usage of the command and all its various options.
 Приложения для работы с атрибутами: listattr, catattr, addattr, rmattr, copyattr
Эти команды предназначены для отображения, извлечения, добавления и удаления атрибутов файлов. Помните, что в данный момент эти мета-данные доступны только на разделах, отформатированных в BFS. Перемещение файлов на другие файловые системы приведут к потере мета-данных!
Перечисленные команды описаны в теме Работа с атрибутами в Терминале.
 Приложения для работы с индексами: lsindex, mkindex, reindex, rmindex
С помощью этих команд вы можете получить список атрибутов BFS, произвести их переиндексацию или удаление. Каждый раздел имеет собственный индекс, сохраняющийся при копировании файлов между разделами.
Эти команды описаны в теме Индексация.
 Relating to package management: package, pkgman
The package command is used to manage HPKG packages. Have a look at the article Installing applications to learn the very basics. Usually the tool haikuporter is used to automatically create packages from so-called recipes.
pkgman is used to search, install, update and uninstall packages. Package repositories can be added, dropped and their package lists refreshed. A special kind of update is invoked with the parameter full-sync: it is more aggressive and also downgrades or removes packages, if necessary.
For more details on a parameter, append "--help", e.g. pkgman search --help
 Полезные скриптовые команды
Утилиты командной строки, приведенные ниже, особенно полезны для написания скриптов (смотрите тему Bash и скрипты).
alert | alert вызывает обычное окно предупрежния с заранее опеределенными иконкой, пояснительным текстом и кнопками (до трех). Например, следующая строка выведет на экран: alert --idea "FantasticApp(tm) installed successfully! \ Would you like a link to it?" "On Desktop" "In Deskbar" "No thanks"
| |
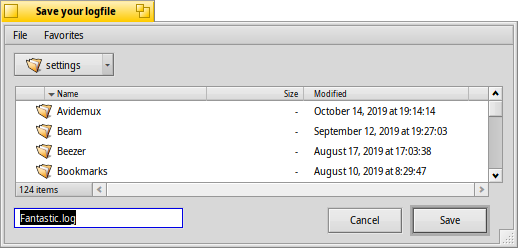
filepanel | filepanel отображает диалог загрузки или сохранения файла, позволяя пользователю выбрать файл или путь. В качестве возвращаемой величины будет передано имя файла или путь к папке. Для изменния доступны несколько параметров, таких как начальная папка, заголовок окна, имя для сохраняемого файла по умолчанию и ограничения на разрешенные типы файлов. Приведем пример: filepanel -s -t "Save your logfile" -d ~/config/settings -n Fantastic.log
| |
hey | hey is a littler helper tool that sends BMessages to applications and prints out their answer. It can be used for application scripting, i.e. "remote controlling" a program from a script or the command line. Its usage is a bit complex... Humdinger's blog post serves as a good introduction, and thanks to Scot Hacker's BeOS Bible, there is a much more comprehensive hey tutorial by Chris Herborth. | |
notify | notify shows a notification panel with a message. There are various parameters that are described when you call notify --help. A notification can also be used to show the progress of some action. When doing that, it's important to set a messageID and always use it when you update the progress (a float between 0.0 and 1.0 that's printed as percent). Otherwise you'll see several notification panels if you update quicker then the set timeout. notify --type progress --group "--group" --title "--title" --icon /boot/home/bebook.hvif \ --messageID MyMessageID --progress .75 "Keep waiting"
| |
query | query является аналогом панели "Найти", выполненным для командной строки. Существует способ быстрого создания правила поиска: постройте запрос в панели "Найти", переключитесь в режим , добавьте двойные кавычки (") в начале и в конце и вставьте строку после комманды query в Терминале или вашем скрипте. | |
waitfor | waitfor удобный способ для ожидания запуска или завершения работы какого-либо приложения или нити. |
 Другие команды
checkfs | checkfs is an important tool to check for errors in your file system. Simply add a volume name like /Haiku or device path and it'll run through every file and correct inconsistencies where possible. | |
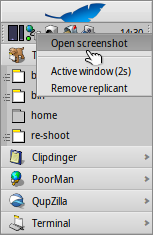
desklink | desklink помещает иконку для любого файла, папки, запроса или приложения в трей Deskbar, и позволяет назначить контекстное меню, вызываемое правым кликом мыши по иконке для выполнения специальных действий. В качестве примера, попробуйте добавить приложение командной строки screenshot с несколькими параметрами ("\" в первой строке используется для разрыва строки в Terminal): desklink "cmd=Active window (2s):/bin/screenshot --window --border --delay 2" \ "cmd=Remove replicant:desklink --remove=screenshot" /bin/screenshot
| |
diskimage | diskimage lets you register a regular file as disk device. For example, you can register a Haiku anyboot image, mount it in Tracker and copy, edit or remove files there before using it as source in the Installer. | |
launch_roster | The launch_daemon starts all sorts of services and applications at boot-up. For some it was instructed to re-start them if they were quit. If you don't want that – maybe you'd like to test a modified Tracker, for example – you use launch_roster to stop the re-starting of the application before quitting it. Similarly, you can start it again or get info about it.c The parameter log prints out a log of all launch_daemon related events. launch_roster stop x-vnd.be-tskb | |
mountvolume | mountvolume is preferred by many to mount local partitions and disks, because its usage is so easy: just call it with the name of the partition and you're done. Try --help for more options. mount can additionally mount remote disks by using a network filesystem, like NFS4. You specify the used filesystem with the -t parameter and the remote location with the -p parameter. As filesystem parameter you can use anything you find in /system/add-ons/kernel/file_system (and corresponding file hierarchies under ~/config or "non-packaged", of course). You also have to create a folder as mountpoint. Here's an example: mkdir -p /DiskStation mount -t nfs4 -p "192.168.178.3:volume1" /DiskStation | |
open | open очень полезный инструмент. С его помощью вы сможете открыть любой файл в предпочитаемом приложении, либо запустить приложение по его сигнатуре, не указывая точный путь до него. Это применимо к URL и "виртуальным" папкам . для текущей папки и .. для родительской папки - они откроются в Tracker. | |
ramdisk | A ramdisk is like a harddisk running only in the computer's memory. That makes it very fast but also volatile, because its contents vanishes when you shut down the computer, or it crashes or you experience a blackout. ramdisk create -s 1gb mkfs -q -t bfs /dev/disk/virtual/ram/0/raw RAMses mountvolume RAMses Note: When creating a ramdisk, the ramdisk command prints out the path to it. If you create several disks, that path /dev/disk/virtual/ram/0/raw will change! To preserve the contents, at least if no calamity like a blackout etc. strikes, a ramdisk can be set up to read/write an image on the harddisk. For that, you need to supply a file of the desired size that will be read from every time you start your ramdisk, and written to when you unmount it. To create an image file "RAMimage" of 500MiB and format it, do this: dd if=/dev/zero of=RAMimage bs=500M count=1 mkfs -q -t bfs /dev/disk/virtual/ram/0/raw RAMimage From now on, you start the ramdisk like this: ramdisk create RAMimage mountvolume RAMimage It's very important to always cleanly unmount you ramdisk, either from Tracker or with unmount /RAMimage, or the changes won't be written back to the image file! |


