 磁盘管理器
磁盘管理器
| 桌面栏: | ||
| 位置: | /boot/system/apps/DriveSetup | |
| 设置: | ~/config/settings/DriveSetup |
DriveSetup is a tool to create, delete and format partitions. At this time it can't resize or move existing partitions, so that you'll either need an unpartitioned volume (perhaps an external USB drive or another harddisk) or do the initial setup with a tool like the GParted LiveCD to provide the space for another partition.

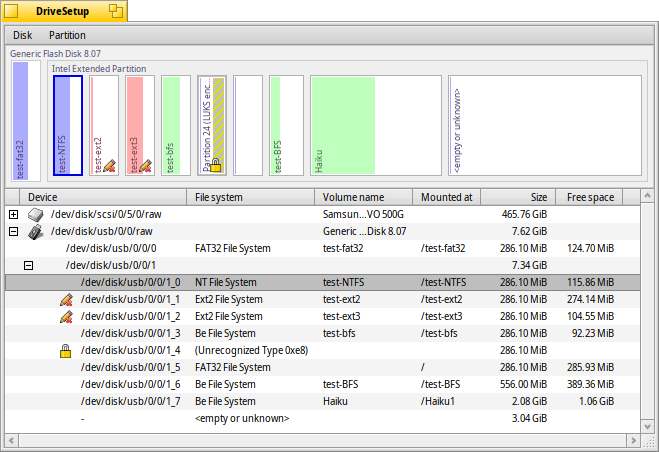
At the top is a graphical representation of all partitions inside the device chosen in the list below it. Each device, by default, can hold a maximum of 4 primary partitions. This limit can be removed by making one of those an extended partition, which in turn can hold theoretically an unlimited number of logical partitions (practical limitations depend on, for example, other OSes installed).
You may have to expand such a list with the +/- widget that appears in that case in front of that device to see the details of every logical partition.
Colors and icons provide some more information about the available volumes and partitions.
Besides the familiar icons for harddisks, CD drives and USB sticks etc., there are a few that indicate a their mount mode:
| The /boot partition | ||
| An encrypted partition | ||
| A partition shared through SMB/NFS etc. | ||
| A partition that was mounted read-only | ||
| A mounted image file (see also the diskimage command) |
When mounted, a colored bar shows the used space of a partition. The color depends on the kind of partition:
| A BFS formatted partition | ||
| A non-BFS formatted partition | ||
| A read-only partition | ||
| An encrypted partition |
You can select a partition and choose various commands from the context or menu, like /, or to .
You can also or completely a partition.
 Initializing a disk
If you don't plan to use just one of the partitions of a larger disk, but the entire drive as one partition, e.g. a USB stick or a Compact Flash card, you'll have to initialize the disk first.
You do this by selecting the raw disk from list of devices and choose a partition map from the menu. The is the right choice for classical booting via a BIOS.
 创建分区
创建分区
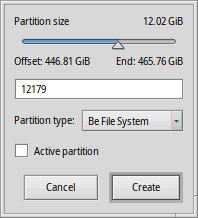
如果您在驱动中发现了未格式化的空间,例如上面的 <empty>,您可以通过 (ALT C)在该空间内新建一个分区。

该对话框提示您对分区大小和类型进行调整。如果您希望此分区用于Haiku的安装,或者您希望使用Haiku所有的特性如属性和查询,您需要选择 。需要注意的是,其他的操作系统可能无法访问该分区。
The checkbox is only available if you have created a primary partition instead of just another logical partition within an extended one. You'll have to tick that checkbox if you plan to use that partition to boot a Haiku installation.
Before you can use, or even mount the newly created partition, it has to be formatted with a filesystem.
 Formatting a partition
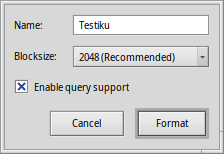
Only unmounted partitions can be formatted by choosing a filesystem from the sub-menu of . The (BFS) is mandatory for a Haiku boot partition and recommended for data partitions to be used with Haiku. Only BFS formatted partitions can be queried and fully support Haiku's file attributes.

Here you set the name for the partition and it's blocksize. The blocksize is the space in bytes that a file will allocate at minimum. 2048 bytes per block are recommended, but you can choose larger or smaller sizes if you have these very specific needs.
If the future data on your partition won't need any querying, you can uncheck to save a bit of overhead for managing the index.
 中文 [中文]
 Bahasa Indonesia
 Català
 Deutsch
 English
 Español
 Français
 Furlan
 Italiano
 Magyar
 Polski
 Português
 Português (Brazil)
 Română
 Slovenčina
 Suomi
Suomi Svenska
 Türkçe
 Русский
 Українська
 日本語
日本語