 Français
 Deutsch
 Italiano
 Русский
 Español
 Svensk
 日本語
日本語 English
| Index |
|
Creating a new e-mail account Setting up incoming e-mail Setting up outgoing e-mail Setting up e-mail filters Setting up the Mail Service |
 E-mail
| Deskbar : | ||
| Localisation : | /boot/system/preferences/E-mail | |
| Réglages : | ~/config/settings/Mail/* |
Haiku provides a system that retrieves e-mail regularly via a Mail Service (also known as mail_daemon) and saves each mail as a single text file. It parses the mail and fills its attributes with all necessary header information, like from, to, subject and its unread status. Now it can be queried by you or any application. This system also makes switching e-mail clients easy as all the data and your configuration stays the same.
The configuration is done in the E-Mail preference panel.
 Créer un nouveau compte e-mail account
Let's go through the process of setting up an e-mail account.
You start by clicking the button to create a new, unnamed account. This opens a panel where you fill in your account info:
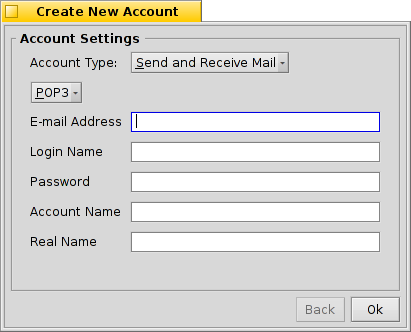
First, declare the Account Type which is either , , or the most usual type, . Then you set how you get your mail, via or .
Now you enter your E-mail Address, Login Name and Password, give an Account Name under which it will be known under Haiku and your Real Name.
If your account is from a major e-mail provider, Haiku already knows all technical details like server IP addresses and the following information is already filled in automatically. If that is not the case, just follow this guide and fill in the details to your e-mail account accordingly.
Configurer la réception des e-mails
Click on under your account's name to set up how e-mails are received.

From the pop-up menu you choose the protocol used by your provider. and are supported.
Next is the address for incoming mails. If your provider needs you to log into a specific port, you add that to the address, separated by a colon. For example, pop.your-provider.org:1400.
Then you enter your login information, Username and Password, and if necessary change the Login Type from the default to for authentication.
If you use POP3 and retrieve mails of this account from different computers, you may want to activate the option to and only locally.
If you use IMAP instead, you have the option to locally. You can specify a to only synchronize with a specific folder and its subfolders.
The offers different methods to announce the arrival of new mail. Try different settings to see what works best for you.
You can change the Location of your inbox (default: /boot/home/mail/in/), which is useful if you'd like to separate the mails from different accounts into their own folders. However, queries let you sort things out just as well.
Last on this page, you can opt to only that are larger than a certain size. This will only get the header and you can decide if you want to download the rest of the message plus possible attachments after seeing the subject and who sent it. Useful if you have a slow connection.
Configurer l'envoi des e-mails
Click on under your account's name to set up how e-mails are sent.
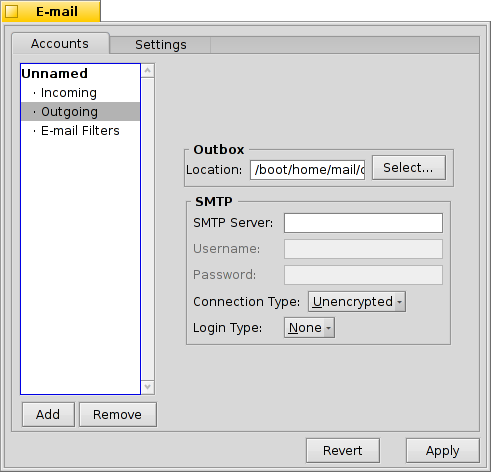
As with incoming mail, you can also change the Location of your outbox (default: /boot/home/mail/out/).
Next is the SMTP Server address for outgoing mails. As with the incoming server before, you can use a specific port if needed, e.g. mail.your-provider.org:1200.
If you need to login, you change the Login Type to and enter username and password above. The other type is used for providers that need you to check for mail with for identification.
Configurer les filtres de réception
If you want to filter your incoming email, you click on under your account's name to set up automatic sorting. You can add any number of filters that are applied one after the other. You can rearrange them by drag&dropping them to their new position.
Besides the that's used for backward compatibility, there are two other you can add.
Filtre anti-pourriel

The spam filter uses statistical methods to classify a mail as unwanted spam. It assigns a value between 0 and 1 to it and you can decide what are the limits for a genuine mail and what will be considered spam.
You can have that spam rating added to the start of the subject.
Also, the spam filter can learn from all incoming e-mail. Of course, you'll have to teach it by sorting out the false positives, mails that were mistakenly marked as spam. You'll find more on that when we discuss the application Mail.
Together with the following filter, you're able to automatically sort out detected spam mails.
Match Header

Ce filtre effectue une action quand une entête correspond au modèle recherché.
Dans la première zone de texte, vous indiquez quel attribut de l'entête vous souhaitez examiner.
Vous avez le choix entre :
| Nom de l'expéditeur | ||
| Adresse e-mail de l'expéditeur | ||
| votre adresse e-mail (différent pour chacun de vos comptes e-mail) | ||
| adresse e-mail à laquelle les réponses sont à expédier | ||
| date et heure de réception du courrier | ||
| objet du message | ||
| adresse de ceux qui reçoivent un copie carbonne (Cc) du courrier | ||
| nom du compte e-mail | ||
| The current status of the e-mail. Normally, this can be "Read", "Replied", "Sent", "Forwarded", "New", or anything you have defined yourself. However, unless you change it yourself in a filter, it will always be "New" after the Mail Service fetched the mail. | ||
| Importance que l'émetteur a accordé au message (par exemple : "urgent"). | ||
| Objet du premier message de la conversation. Correspond au "Subject", mais sans les indicateurs "Re:" ou "Fwd:" | ||
| depending on what the spam filter classified it as, this will either be empty (if uncertain) or contain the word "Genuine" or "Spam" | ||
| this is a numerical estimate that the spam filter assigned to the e-mail. They are shown in scientific notation, where 1.065e-12 translates to 1.065 divided by 10 to the 12th power, which in this case translates to 0.000000000001065. |
The second text field holds your search pattern. It accepts regular expressions which gives it great flexibility, while unfortunately complicating things a bit. Read up on it a bit, it's well worth it and simple search patterns aren't that complicated at all.
Avec la liste déroulante en dessous, vous affectez une action lorsque le motif est reconnu. Vous pouvez déplacer ou supprimer un mail, modifier son statut, ou encore définir le compte e-mail avec lequel vous répondrez.
Configurer les filtres d'envoi
At this moment, there's only one filter that deals with outgoing mail: fortune.
It will attach a randomly chosen funny or wise "fortune cookie" to the end of every mail before it's sent out. You can do a dry run by issuing the command fortune in a Terminal.
Configurer le service de messagerie
Now that your incoming and outgoing mail servers (and maybe some filters, too), are configured, you have to tell the Mail Service that does all the actual checking and fetching how to do its job.

Under Mail Checking you configure the interval at which the account's mail server is probed for new mail.
If you're on a dial-up connection, you may want to do that and also to avoid dialing automatically in regularly only to check for mail.
The Mail Service has a status window which you can set to show up , , or .
Make sure to or there will be no mail_daemon running to do your bidding...
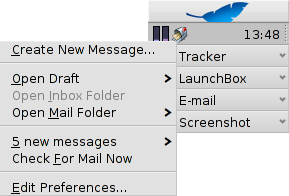
will open the folder /boot/home/config/Mail/Menu Links/. All folders or queries (!) or their links put into this folder will appear in the context menu of the mailbox icon of the Mail Services in the Deskbar tray.
From that menu, you can also , or .
The mailbox icon itself shows if there are unread messages (status "New") when there are envelopes inside.