 E-mail
| Deskbar: | ||
| Ubicación: | /boot/system/preferences/E-mail | |
| Configuración: | ~/config/settings/Mail/* |
Haiku incluye un sistema que obtiene el correo electrónico regularmente mediante un servicio de correo (también conocido como mail_daemon) y guarda cada correo como un archivo de texto individual. Analiza el correo y rellena sus atributos con toda la información necesaria en la cabecera, como por ejemplo los campos De, Para, Asunto, y su estado de lectura. Ahora ya puede ser consultado por usted o por cualquier aplicación. Este sistema hace que cambiar de clientes de correo sea sencillo, ya que todos los datos y configuraciones permanecen iguales.
La configuración se realiza desde el panel de preferencias de la aplicación.
 Creación de una cuenta de correo electrónico
Empecemos el proceso de configurar una cuenta de correo electrónico..
Se puede comenzar haciendo clic en el botón para crear una cuenta nueva sin nombre. Esto abre una ventana donde se rellena toda la información de la cuenta:
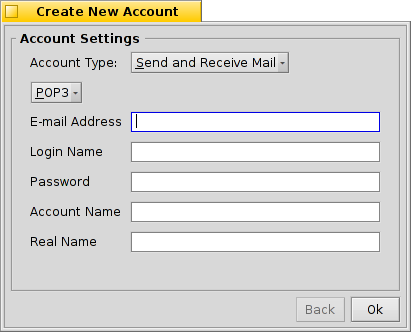
Primero, escriba el tipo de cuenta (Account Type) que puede ser o bien , , o el tipo mas común, . Después se selecciona la forma en la que obtiene el correo, con o .
Ahora se introduce la dirección de correo electrónico (E-mail Address), nombre de usuario (Login Name) y clave (Password), escriba un nombre para la cuenta (Account Name) que será como se muestre en Haiku, y su nombre real (Real Name).
Si la cuenta es de algún proveedor importante de correo electrónico, Haiku ya conoce todos los detalles técnicos como las direcciones IP del servidor y la información se rellena automáticamente. Si ese no es el caso, sólo tiene que seguir esta guía y rellenar los detalles para su cuenta de correo adecuadamente.
 Configuración para la recepción de mensajes
Haga clic en bajo el nombre de su cuenta para configurar cómo se reciben los correos.
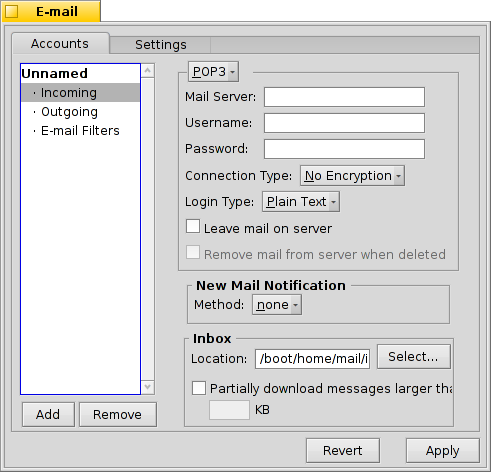
Desde el menú emergente se elige el tipo de protocolo que usa su proveedor. y están soportados.
Lo siguiente es la dirección del para los correos entrantes. Si su proveedor necesita que entre por algún puerto específico, añádalo directamente a la dirección, separado por dos puntos. Por ejemplo, pop.su-proveedor.org:1400.
Then you enter your login information, Username and Password, and if necessary change the Login Type from the default to for authentication.
If you use POP3 and retrieve mails of this account from different computers, you may want to activate the option to and only locally.
If you use IMAP instead, you have the option to locally. You can specify a to only synchronize with a specific folder and its subfolders.
The offers different methods to announce the arrival of new mail. Try different settings to see what works best for you.
You can change the Location of your inbox (default: /boot/home/mail/in/), which is useful if you'd like to separate the mails from different accounts into their own folders. However, queries let you sort things out just as well.
Last on this page, you can opt to only that are larger than a certain size. This will only get the header and you can decide if you want to download the rest of the message plus possible attachments after seeing the subject and who sent it. Useful if you have a slow connection.
 Configuración para el envío de mensajes
Click on under your account's name to set up how e-mails are sent.
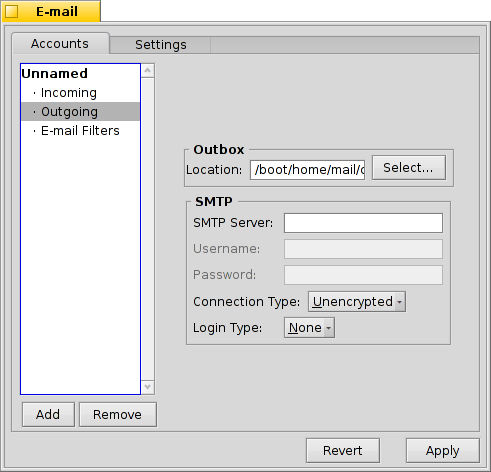
As with incoming mail, you can also change the Location of your outbox (default: /boot/home/mail/out/).
Next is the SMTP Server address for outgoing mails. As with the incoming server before, you can use a specific port if needed, e.g. mail.your-provider.org:1200.
If you need to login, you change the Login Type to and enter username and password above. The other type is used for providers that need you to check for mail with for identification.
 Configuración de filtros de mensajes
If you want to filter your incoming email, you click on under your account's name to set up automatic sorting. You can add any number of filters that are applied one after the other. You can rearrange them by drag&dropping them to their new position.
Besides the that's used for backward compatibility, there are two other you can add.
 Filtro de mensajes no deseados (Spam)

The spam filter uses statistical methods to classify a mail as unwanted spam. It assigns a value between 0 and 1 to it and you can decide what are the limits for a genuine mail and what will be considered spam.
You can have that spam rating added to the start of the subject.
Also, the spam filter can learn from all incoming e-mail. Of course, you'll have to teach it by sorting out the false positives, mails that were mistakenly marked as spam. You'll find more on that when we discuss the application Mail.
Together with the following filter, you're able to automatically sort out detected spam mails.
 Campos del encabezado como criterio de filtrado (Match Header)

This filter compares a header to a search pattern and performs some action when it matches.
With the first text field you specify which header to check against. These are available:
| Nombre del remitente | ||
| Dirección de correo electrónico del remitente | ||
| Su dirección de correo electrónico (una diferente para cada cuenta) | ||
| Dirección a la cual se envían las respuestas | ||
| Fecha y hora en que se ha recibido el mensaje | ||
| Asunto del mensaje | ||
| Direcciones de quieres reciben copias del mensaje | ||
| Nombre de la cuenta de correo electrónico | ||
| Estado actual del mensaje. El estado del mensaje puede ser: "Read" (leido), "Replied" (respondido), "Sent" (enviado), "Forwarded" (transferido), "New" (nuevo) o cualquier otro estado definido por el usuario. Cuando el Servicio de Correo baja un mensaje, su estado inicial será siempre "New" (nuevo), salvo que se lo modifique mediante un filto. | ||
| Prioridad del mensaje definida por el programa de correo electrónico remitente (por ejemplo, "urgente") | ||
| essentially the same as "Subject", but without things like Re: or Fwd: | ||
| depending on what the spam filter classified it as, this will either be empty (if uncertain) or contain the word "Genuine" or "Spam" | ||
| this is a numerical estimate that the spam filter assigned to the e-mail. They are shown in scientific notation, where 1.065e-12 translates to 1.065 divided by 10 to the 12th power, which in this case translates to 0.000000000001065. |
The second text field holds your search pattern. It accepts regular expressions which gives it great flexibility, while unfortunately complicating things a bit. Read up on it a bit, it's well worth it and simple search patterns aren't that complicated at all.
With the pop-up menu below it, you assign an action when the pattern matches. You can move or delete a mail, set the status to "Read" or anything else or set the e-mail account you'll reply with.
 Filtros para mensajes enviados
At this moment, there's only one filter that deals with outgoing mail: fortune.
It will attach a randomly chosen funny or wise "fortune cookie" to the end of every mail before it's sent out. You can do a dry run by issuing the command fortune in a Terminal.
 Configuración del Servicio de Correo
Now that your incoming and outgoing mail servers (and maybe some filters, too), are configured, you have to tell the Mail Service that does all the actual checking and fetching how to do its job.
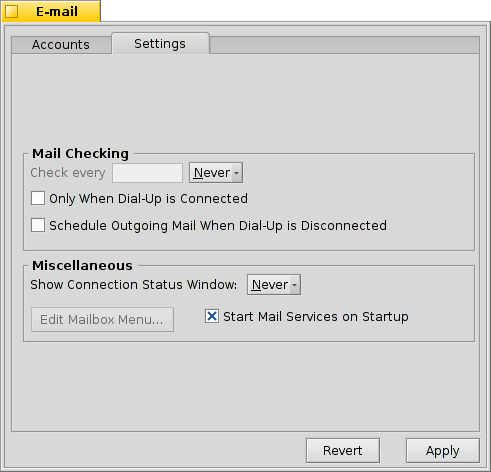
Under Mail Checking you configure the interval at which the account's mail server is probed for new mail.
If you're on a dial-up connection, you may want to do that and also to avoid dialing automatically in regularly only to check for mail.
The Mail Service has a status window which you can set to show up , , or .
Make sure to or there will be no mail_daemon running to do your bidding...
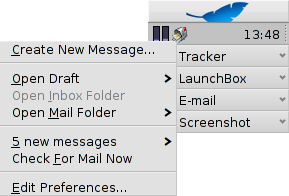
will open the folder /boot/home/config/Mail/Menu Links/. All folders or queries (!) or their links put into this folder will appear in the context menu of the mailbox icon of the Mail Services in the Deskbar tray.
From that menu, you can also , or .
The mailbox icon itself shows if there are unread messages (status "New") when there are envelopes inside.
 Español
 Français
 Deutsch
 Italiano
 Русский
 Svensk
 日本語
日本語 English