 Español
 Français
 Deutsch
 Italiano
 Русский
 Svensk
 日本語
日本語 Українська
 English
| Índice |
| BeOS bitmap vs. Haiku vector icons Icons are attributes Creating icons with Icon-O-Matic Path Shape Style Transformer Saving an icon Tips & Tricks |
 Icon-O-Matic
| Deskbar: | ||
| Ubicación: | /boot/system/apps/Icon-O-Matic | |
| Configuración: | ~/config/settings/Icon-O-Matic |
Antes de adentrarnos en la creación de iconos con Icon-O-Matic, comencemos con una introducción general sobre los iconos en Haiku.
 Los mapas de bits de BeOS frente a los iconos vectoriales de Haiku
En contraposición a BeOS, Haiku usa iconos vectoriales en lugar de iconos de mapas de bits. Se ha desarrollado un formato especial para este tipo de iconos: HVIF (Haiku Vector Icon Format); que está altamente optimizado para archivos de poco tamaño y rápido servicio. Esa es la razón de por qué la mayor parte de nuestros iconos much ocupan menos espacio que un mapa de bits o el ampliamente usado formato SVG. Además, a diferencia de los iconos de BeOS, Haiku no tiene la limitación de 8 bits (256 colores),
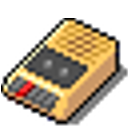
Tomemos este icono de Terminal, por ejemplo:
| Bitmap (Mapa de Bits) | SVG | HVIF |
| 1,024 bytes + 256 bytes | 7,192 bytes | 768 bytes |
Fíjese en que BeOS usa dos versiones de cada icono, una de 16x16 y otra de 32x32, para conseguir buenos efectos visuales tanto en el modo de visión Listado, como en el de Vista de Iconos.
Este ingenioso truco no es necesario con los iconos vectoriales. Además de ocupar menos espacio en disco, los iconos vectoriales también se amplían mucho mejor que los maspas de bits. (Nota: BeOS ofrecía sólo una visualización de 16x16 y 32x32.)
| 16x16 | 32x32 | 64x64 | 128x128 | |
| Bitmap (Mapa de Bits) |  |
 | ||
| Vector |  |
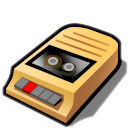 |
Los iconos son atributos
Los iconos se almacenan como un atributo de su archivo correspondiente. Sin embargo, eso no significa que cada archivo tenga que tener este atributro para ser mostrado con icono en una ventana del Tracker: Los archivos de datos reciben su icono según su tipo. Para cambiar cambiar los iconos asociados a cada tipo de archivo se puede hacer desde las preferencias de FileTypes(Tipos de Archivo). Si sólo quiere añadir un icono especial a un archivo en concreto, se puede hacer a través de FileType Add-On simplemente. Lea la información de Filetypes (Tipos de Archivo) para más información.
Creación de iconos con Icon-O-Matic
Icon-O-Matic es el editor de iconos de Haiku que puede exportar el resultado tanto en HVIF, como en SVG y PNG. El icono también puede ser directamente enlazado a un archivo existente o exportado como un archivo de fuente de un programa usado por desarrolladores. Como la aplicación se ha hecho a medida del formato optimizado HVIF, su utilización da muestras del trabajo interno de este formato.
Other than your normal vector graphics software, you don't deal with separate objects that each include all their specific properties like path, stroke width, stroke and fill color etc. Rather, you assemble your objects ("shapes") from shared paths and colors ("styles") and set certain properties. This re-using of elements is one secret of HVIF's efficiency. Although that imposes some constraints on the icon designer, there are a few advantages, too.
For example, by re-using a path, several objects can be modified together by manipulating this one path. Think of an object and its shadow. Modifying their shared path will change the object itself and automatically its (maybe slightly distorted/translated) shadow.
Aquí se muestra una visión general de la ventana de Icon-O-Matic:
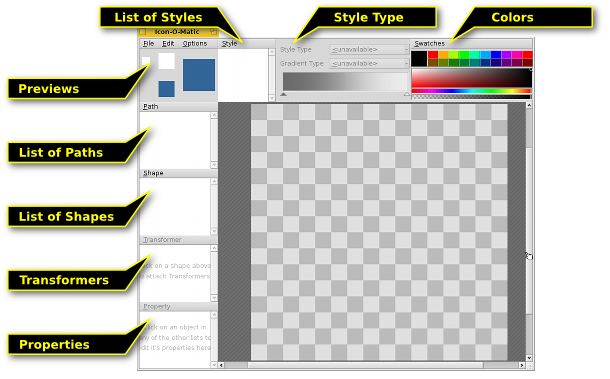
Para crear cualquier objeto visible en el área de trabajo, se necesita una de las ya mencionadas formas con una ruta y un estilo. Según interese, se pueden crear una, dos, o tres juntas desde el menú . Cada tipo de objeto (Rutas, Formas,Transformadores y Estlios) tiene un menú sobre u lista de elementos, ofreciendo diversas órdenes. Cada elemento tiene un determinado número de opciones que se configuran desde .
Rutas
Se llama ruta a un conjunto de puntos interconectados con líneas o curvas Bezier. Para añadir o cambiar puntos, asegúrese de que la ruta deseada está seleccionada en la lista de rutas.
Con sólo clicar en el área de trabajo se establece un punto inicial. Mientras se coloca un punto se decide si la línea resultante será recta o curva: un simple click y soltar produce una línea recta, manteniendo presionado el botón del ratón y moviendo el cursor se delimita una línea Beizer curva. Evidentemente, es poible cambiar después los tipos de líneas.
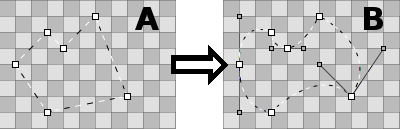
To get from "A" to "B", you have to transform some points from corner-points to curve-points. That's done by holding ALT while clicking on a point and dragging out the handles. This results in a symmetrical Bezier: the second handle follows the movement of the other. If you need to move the handles independently, again click&drag on a Bezier handle while holding ALT.
Vice versa, to go from Bezier to a corner-point, hold ALT and click on a point.
Para amover un punto, simplemente se coge con el cursor y se suelta en su nueva ubicación. Para sleccionar más de un punto mantenga pulsado SHIFT y marque un rectángulo de selección. Los puntos seleccionados están marcados por un borde rojo en vez del negro habitual.
Para insertar un punto dentro de una ruta se clica en la línea de unión entre dos puntos.
Los puntos seleccionados son eliminados al presionar DEL o al clicar sobre cualquier punto mientras se deja pulsada la tecla CTRL.
El puntero del ratón indica el modo actual:
| Mover punto(s) | Insertar punto | Añadir punto | Borrar punto CTRL |
Esquina↔Bezier ALT |
Seleccionar punto SHIFT |
Se puede solicitar un menú contextual clicando con el botón derecho sobre un punto o una elección de puntos:
| ALT A | Selecciona todos los puntos de la ruta actual. | |
| T | Pone todos los puntos seleccionados en una caja de transformación, pudiendo moverlos, redimensionarlos y rotarlos todos a la vez. Funciona igualmente con formas, como se describe un poco más abajo. | |
| Divide los puntos seleccionados en dos, uno sobre otro. | ||
| Rota los puntos seleccionados 180°. Sólo tiene efecto en los puntos del tipo Bezier. | ||
| DEL | Elimina los puntos seleccionados |
Menú Ruta
El menú ofrece unas pocas opciones básicas a y o a o una ruta. Aquí están algunos casos que pueden necesitar algo más de explicación:
| If your path isn't "closed" (see Path Properties below), a click into the canvas always creates a new point, connecting it with the last one. "Reverse" will reverse this order and your new point will connect to original start point instead. | ||
| Most useful with imported SVGs, this function will remove redundant points. | ||
| ALT R | Practically, this rotates the opening of a path. It's best seen when using a not-closed path with a style and a shape with a stroke transformer. Now, if your path looks like a ⊂ it will rotate like this: ⊂ ∩ ⊃ ∪. | |
| ALT SHIFT R | Does the same in the other direction. |
Propiedades de Ruta
, en la zona inferior izquierda de la ventana, ofrece todas las herramientas disponibles para el objeto seleccionado en ese momento. Una ruta sólo tiene dos: un y si está o no.
Ruta
Una forma agrupa juntas una o más rutas con un estilo. A efectos prácticos, es el objeto que se verá en el área de trabajo. La agrupación se hace mediante los recuadros de selección frente a rutas y estilos: Simplemente seleccione y marque la ruta y el estilo deseados.
A shape defines how a path and style is applied, e.g. if the object is filled or only stroked (which is done by using Transformers on the shape, we'll get to that later). Also, a shape can be moved, rotated or resized without touching the used path. That way, you can re-use a single path and get different, but related, shapes.
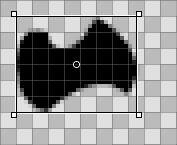
Cuando se selecciona una forma de la lista, se dibuja un rectángulo a su alredeor. En función de dónde se seleccione, la forma es movida, redimensionada o girada alrededor de un punto en su centro, e cual puede ser movido. Manteniendo pulsado SHIFT se fija la dirección al ser movida, limitando la rotación a 45 grados y restringiendo la proporción cuando se redimensiona. El estado del puntero indica, de nuevo, el modo de trabajo actual:
| Mover | Redimensionar | Rotar | Mover centro de rotación |
Shapes lie on top of each other, each is on its own layer, if you will. To reorder them you drag&drop their entry to a different position in the list.
Menú Forma
El menú ofrece las opciones anteriormente mencionadas de y o una forma. Entoces hay:
| Reverts all the move, resize and rotate transformations you have applied to the shape. | ||
| When you transform a shape, its assigned path(s) stay in their original position. This may be intended; maybe more than one shape is using that path, maybe you intentionally used to set the points at precise pixel borders. If not, "Freeze Transformation" will apply the current shape transformation to the assigned path(s). A future "Reset Transformation" will then return to this new state. |
Shape Properties
Besides a , the view for a shape has these options:
| Minimum Level of Detail | ||
| Maximum Level of Detail |
Nivel de Detalle
| 16x16 | 32x32 | 64x64 |
See how there are no numbers in the 16px version of the BeVexed icon? That's done with the "Level of Detail" setting of their shapes.
With the LOD you control the visibility of a shape depending on its size. That way, you can leave away details of an icon that look good on a bigger icon, but maybe not so much on its smaller version.
This is how it works: A LOD of 1.0 is defined as a 64px icon size. To get the LOD of a particular icon size you simply divide it by 64, e.g. a 16px icon has a LOD of 16/64 = 0.25. A shape won't be visible below its and above its .
So, if you set a shape's to 0.0 and the to 0.5, this means that the shape will only be visible for icon sizes smaller or equal to 32px. If you wanted to exclude the 32px icon size, you'd have to stay below 0.5, say 0.49.
The LOD is not only for leaving out detailing shapes, but also to e.g. change the stroke width at different sizes, if you feel that's needed. Simply duplicate a shape, make your changes and set both of their LOD settings to show either one or the other. Here lies the only source of potential confusion, when you unwittingly overlap LODs of shapes, and wonder why at some size both are visible...
For example, if Shape 1 were to be shown below 48px and Shape 2 from 48px upward (LOD: 48/64 = 0.75):
| OK | Not OK! | ||||
| Forma 1 | Min LOD | 0.00 | Min LOD | 0.00 | |
| Max LOD | 0.74 | Max LOD | 0.75 | ||
| Forma 2 | Min LOD | 0.75 | Min LOD | 0.75 | |
| Max LOD | 4.00 | Max LOD | 4.00 | ||
Estilo
Un estilo puede ser un color sólido o algún tipo de gradiente.
Además de los colores predefinidos bajo , se pueden mezclar colores propios clicando sobre el color actual. Fíjese, además en el control deslizante bajo el espectro de colores, el cual establece el nivel de transparencia.

De forma rápida se crea un nuevo estilo mezclando su color y simplemente arrastrando & soltándolo en la lista de estilos.
If you go for a gradient, you set the type (, , , ) and then define the start and end colors. This is done with a drag&drop from a color bucket into the respective color indicator under the gradient.
Of course you can move these indicators to change the gradient to your liking. You can also insert more indicators to add more colors by double-clicking into the gradient. Pressing DEL removes the selected indicator.
You can move, resize and rotate the representing box of a gradient on the canvas until it fits your needs. This works just like with shapes.
Menú Estilo
The menu offers the usual entries to , or a style and to .
Propiedades de Estilo
El es la única de un estilo.
Transformer
A shape can have Transformers which change its appearance. The effects, however, are more subtle than a truck turning into a battle robot...
Transformer Add Menu
| Adds an outline to a shape. | ||
| Strokes the path of a shape instead of filling it with a style. |
Depending on the kind of Transformer, you'll get a different set of properties.
Transformer Properties
Besides a and the actual for the transformer, the view has these (depending on its type slightly differing) options:
| Stroke only. Defines the end caps of a line: , or . | ||
| Contour only. Determines if the contour is to the inside or outside the path. | ||
| Defines how lines are joint at a point: , or . | ||
| Only when the above is set to "Miter" this setting influences the looks of the miter joint. |
Guardar un icono
There's your usual menu bar at the top, , , . The usage is pretty much self-explaining, so we'll only look at how to save your work.
will save in a special Icon-O-Matic format that retains additional information like the names of paths, shapes and styles. These will be stripped from the actual icon once you export it to save space. It's a good idea to back-up your work like this, because without named objects everything's named "<path>/<shape>/<style>" which makes specific changes tedious.
opens a familiar save panel with a file format dropdown menu at the bottom, offering these choices:
| HVIF | Haiku Vector Icon Format | |
| HVIF RDef | Saves as resource used by programmers | |
| HVIF Source Code | Saves as source code used by programmers | |
| SVG | Saves as SVG | |
| PNG | Saves as a 64px sized PNG | |
| PNG Set | Saves as 16, 32 and 64px sized PNGs | |
| BEOS:ICON Attribute | Choose a file and set its icon attribute directly | |
| META:ICON Attribute | Choose a file and attach the icon as mere meta data |
Consejos y Trucos
A few things you should keep in mind when working with Icon-O-Matic and some general tips for its usage:
Read the Icon Guidelines to learn about important characteristics of Haiku icons, e.g. perspective, colors and shadows.
You should always try to minimize your use of paths, those are the most expensive, file size wise. Re-use paths wherever possible and work with manipulated shapes and their transformers instead. Smart use of gradients can also save space.
Wherever possible, you should activate Snap-to-Grid from the menu when editing paths. Path points that align with the 64x64 pixel grid use less storage space. You'll also get the crispest look if points are set on exact pixel borders. For example, it is important to align the most prominent outlines with the 16x16 grid.
Check the preview to see if your icon still looks good in 16x16. You may want to use the Level Of Detail settings described in the Shapes section.
There's an easy way to produce letters, even if Icon-O-Matic doesn't provide such a tool. Just enter the text in a text editor such as StyledEdit, adjust font type and style, and drag&drop or copy&paste the selected text into Icon-O-Matic. This will create the according paths and shapes.
If you assign more than one path to a shape, their overlapping areas will cancel each other out. When one path is completely inside another, it practically creates a hole in the resulting shape.
You can zoom in and out of the canvas with the mouse wheel. Panning is done either by click&drag with the middle mouse button or with a normal left-click&drag while holding SPACE.