| インデックス |
|
Creating a new e-mail account Account settings Setting up incoming e-mail Setting up outgoing e-mail Notifications and e-mail filters Setting up the Mail Service |
 電子メール
電子メール
| Deskbar メニュー: | ||
| 場所: | /boot/system/preferences/E-mail | |
| 設定ファイル: | ~/config/settings/Mail/* |
Haikuは、Mailサービス(mail_daemon)を通じ定期的に電子メールを取得して、メールごとに単一のテキストファイルに保存するシステムを提供します。システムはメールを解析して、差出人、宛先、題名、未読(既読)といった必要なすべてのヘッダ情報で属性を設定します。処理は直接あるいは各アプリケーションから要求できます。また、このシステムはすべてのデータと構成を保ちつつ電子メールクライアントを切り替えることを容易にします。
構成は電子メール設定パネルで行います。
 新しい電子メールアカウントの作成
電子メールアカウントの設定手順を追っていきましょう。
新しく無名のアカウントを作るために、まず ボタンをクリックします。すると、アカウント情報を入力するパネルが開きます:
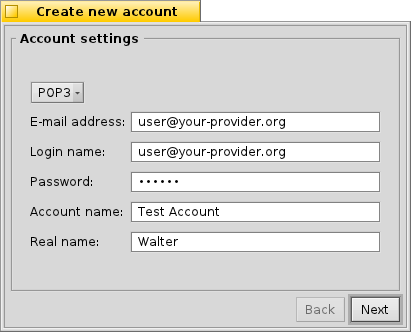
First, you set how you get your mail, via or .
それからE-mail Address(電子メールアドレス)、 Login Name(ログイン名)、 Password(パスワード)を入力して、 Haiku内で用いられるAccount Name(アカウント名)とReal Name(本名)も決めてください。
If your account is from a major e-mail provider, Haiku already knows all technical details like server IP addresses. If that is not the case, clicking will open another window to enter this information by hand:
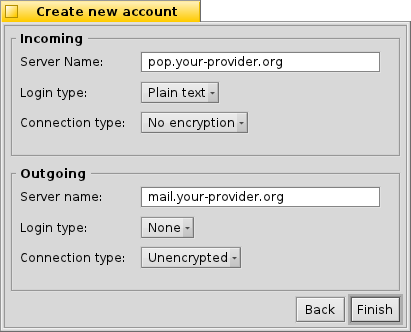
You first set the Server name, Login type and Connection type for the incoming mail, below that for the outgoing mail. You should find the necessary information on your email provider's website.
See below for more info about the various settings and additional options.
 Account settings
By selecting the name of an account in the left list, you can change some general settings:
The Account name is the name that's shown for example in the list of accounts in the E-mail preferences. Real name is the name someone sees when she gets mail from you. Return address is the email address that is used when someone replies to your mail. Normally that is the same address you've sent your email from.
If you'd like to use an email account to only send or only receive email, you can de/activate that usage by right-clicking the account's name in the leftside list to set the checkmarks accordingly.
 More on setting up incoming e-mail
どのように電子メールを受信するか設定するには、アカウント名の下にあるをクリックします。
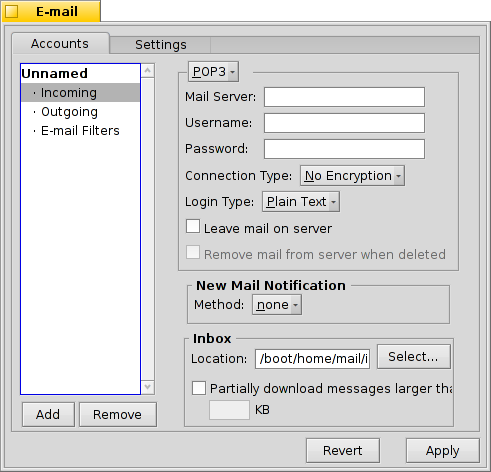
First is the address for incoming mails. If your provider needs you to log into a specific port, you add that to the address, separated by a colon. For example, pop.your-provider.org:1400.
Then you enter your login information, Login name and Password, and if necessary change the Login type from the default to for authentication.
もしあなたがPOP3を使っていて、このアカウントのメールを複数のコンピューターで取得するなら、オプションを有効にして、ローカルのみでを行うとよいでしょう。
If you use IMAP instead, you have the option to locally. You can specify to only synchronize with a specific folder and its subfolders.
Also, you can opt to only a certain size. This will only get the header and you can decide if you want to download the rest of the message plus possible attachments after seeing the subject and who sent it. Useful if you have a slow connection.
You can change the Destination of your inbox (default: /boot/home/mail/in/), which is useful if you'd like to separate the mails from different accounts into their own folders. However, queries let you sort things out just as well.
 More on setting up outgoing e-mail
どのように電子メールを送信するか設定するには、アカウント名の下にあるをクリックします。
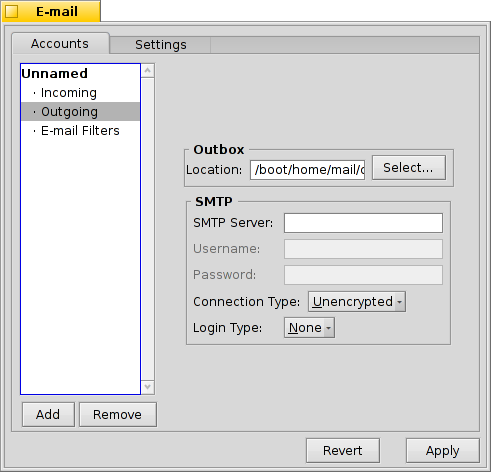
First is the SMTP server address for outgoing mails. As with the incoming server before, you can use a specific port if needed, e.g. mail.your-provider.org:1200.
ログインする必要があれば、Login Type(ログインの種類)をに変更しユーザー名とパスワードを入力します。 もうひとつは、プロバイダーがメール確認時に認証のためを要求する場合に用いられます。
As with incoming mail, you can also change the Destination of your outbox (default: /boot/home/mail/out/).
 Notifications and other e-mail filters
Notifications for newly arrived email and methods to sort and filter emails are found in under an account's name. You can add any number of filters that are applied one after the other and rearrange them by drag&dropping them to their new position.
Currently there are three you can add. After adding a filter, you have to select it to see its options.
 Spam filter (AGMS Bayesian)

スパムフィルタは不要なスパムの判定に統計的手法を利用します。メールには0から1の評価値が付与され、ユーザーはスパムと通常のメールとの境界値を決めることができます。
評価値を受信メールの題名の先頭に追加することが可能です。
また、スパムフィルタはすべての受信メールから学習することができます。もちろん、誤ってスパム判定されている偽陽性のメールを仕分けて、スパムフィルタに学習させなくてはいけません。Mail(メール)アプリケーションについての説明で詳しく知ることができるでしょう。
Together with the following , you're able to automatically sort out detected spam mails.
 Rule filter

This filter compares the mail header to a search pattern and performs some action according to the rules you set up.
With the first text field you specify which header to check against. These are available:
| 差出人の名前 | ||
| 差出人の電子メールアドレス | ||
| (宛先) | あなたの電子メールアドレス(アカウントによって異なります) | |
| 返信先の電子メールアドレス | ||
| メールが受信された日時 | ||
| メールの題名 | ||
| メールの複製(Cc)を受信するアドレスの一覧 | ||
| 電子メールアカウントの名前 | ||
| 電子メールのステータスを表します。通常は"Read(来読)"、"Replied(返信済み)"、"Sent(送信済み)"、"Forwarded(転送済み)"、"New(新規)"、または自分自身で定義したものです。ただし、フィルタでここを変更しても、Mailサービスがメールを取得した後は常に"New(新規)"が適用されています。 | ||
| (優先度) | 差出人の電子メールプログラム側で設定されます。(例 "urgent(緊急)") | |
| 基本的に"Subject"と同じですが、Re:やFwd:といった文字列が除かれます。 | ||
| (分類グループ) | スパムフィルタの判定に依存して、空白(不確かな場合)か、あるいは"Genue(本物)"か"Spam(スパム)"の文字列を含みます。 | |
| (評価値) | これはスパムフィルタが電子メールに付加する評価の数値です。これは科学的な記法で表記され、例えば1.065e-12は1.065を10の12乗で割った0.000000000001065を意味します。 |
2番目のテキストフィールドには検索パターンを入力します。ここではregular expression(正規表現)が利用可能で、多少複雑になる場合があるものの高い柔軟性を提供しています。 リンク先を少し読めば、正規表現を利用する価値が充分にあり、また単純な検索パターンに関してはまったく複雑にならないことが分かるでしょう。
その下のポップアップメニューで、パターンが一致した際の処理を選択します。メールの移動や削除、"Read(既読)"などメールのステータス変更、返信に用いる電子メールアドレスの設定ができます。
 New mails notification

There are several ways you can choose to be notified of newly arrived email. Under you find a number of options that can be combined as well:
| No notification | ||
| Plays the sound file of the "New E-mail" event set in the Sounds preferences for every new email | ||
| Shows an alert window for every new email | ||
| Blinks some LEDs like the caps-lock indicator | ||
| Shows one alert window for all new mails | ||
| Plays the sound file of the "New E-mail" event set in the Sounds preferences once for new mail | ||
| Shows the log window |
 送信メールフィルタ
送信するメールに適用できるフィルタはたったひとつです: fortune(占い)。
このフィルタは送信するメールが送られる前に、その末尾にランダムに選ばれた愉快な(あるいは賢い)"fortune cookie"を付け加えます。これはターミナルででfortuneコマンドを実行することで試すことができます。
 Mailサービスの設定
受信及び送信メールサーバの設定が(おそらくフィルターの設定も)完了したので、実際の確認と取得のすべてを行うMailサービスに、ジョブをどのように行うか知らせる必要があります。

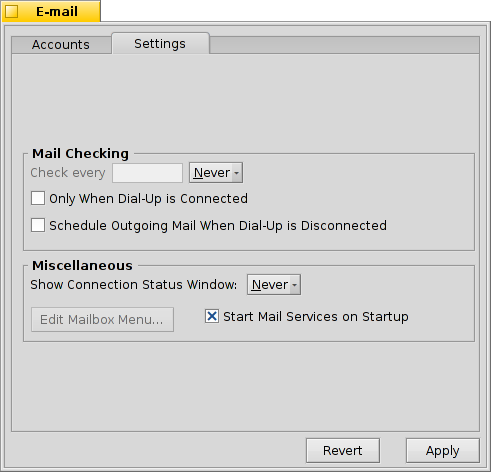
Mail Checkingで アカウントのメールサーバに新着メールの問い合わせを行う間隔を指定します。
ダイヤルアップ接続を利用している場合、メールチェックのためだけに自動でダイヤルしてしまうのを防ぐためとを有効にするとよいでしょう。
Mailサービスでは、ステータスウィンドウの表示を、、、から選択できます。
が無効だと処理を実行するmail_daemonが起動していないので、有効であるかしっかり確かめてください。
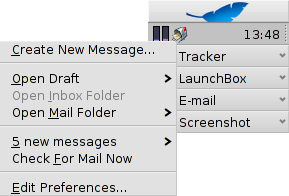
は/boot/home/config/Mail/Menu Links/フォルダを開きます。この中に格納されたすべてのフォルダやクエリ、またそれらのリンクが、デスク箱トレイのMailサービスにあるメールボックスアイコンのコンテキストメニューに表示されます。
From that menu, you can also , or edit .
If you hold down SHIFT when invoking the context menu, you'll get additional commands:
| Offers a submenu to check only one specific account | ||
| Allows you to send pending mails without also checking for new mails | ||
| Quits the whole email infrastructure (mail_daemon) |
メール箱アイコンは、未読メッセージ("New(新規)"ステータス)がある場合に中に封筒マークを表示します。
 日本語
日本語 Français
 Deutsch
 Italiano
 Русский
 Español
 Svenska
 Українська
 中文 [中文]
 Português
 Suomi
Suomi Slovenčina
 English