 Українська
 Français
 Deutsch
 Italiano
 Русский
 Español
 Svenska
 日本語
日本語 中文 [中文]
 Português
 Suomi
Suomi Slovenčina
 Magyar
 Português (Brazil)
 Català
 English
| Index |
|
Getting supported hardware to work Joining a wireless network Joining from the command line Tips |
Workshop: Wireless networking
Getting the networking to run is essential in today's need for permanent internet connection. As keeping up to date with all the different and ever changing hardware and drivers is quite impossible for a small project, Haiku relies on a FreeBSD compatibility layer for its networking drivers.
This ensures a massive amount of supported hardware, though probably not 100% of what's out there. See this list online for a list of supported models or check FreeBSD 9.1's release hardware notes.
PCMCIA, CardBus, ExpressCard, USB and ISA devices still need more work to become functional.
 Getting supported hardware to work
Even if the first hurdle of generally supported hardware is taken, some wireless network cards require binary firmware modules to properly operate. Haiku cannot include some of these proprietary firmware files due to licensing issues. Haiku does however include a simple script which will retrieve and install all of the needed proprietary bits for you. Generally, if you are planning to use wireless networking, it is a good idea to run this script to ensure your system has all of these firmwares available when they are needed.
Open a Terminal and type:
install-wifi-firmwares.sh
Now review the licenses and accept them to install all of the available firmware files.
If you don't have internet access to download those lacking firmwares under Haiku, there's an offline method, see under tips below.
Joining a wireless network
By default, Haiku will join the first unencrypted wireless network it finds after booting up. To connect to a specific network, you use the Desktop applet NetworkStatus.
Right-click on its icon in the Deskbar and choose the network's public name (which is the "SSID" it broadcasts) from the context menu.

A window opens where you enter the type of authentication (probably WPA/WPA2, WEP is not a secure encryption anymore!) and the password for that wireless network. Click to start the login process.
Depending on your hardware and network configuration this may take a while. You'll be kept informed of the progress by notifications:
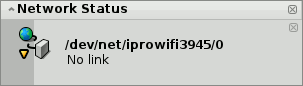
Once it reads "Ready" and the NetworkStatus icon in the Deskbar shows a green round light, the connection is established. If the notifications end in "No link" and a yellow triangle, something went wrong, probably an incorrect password.
Joining from the command line
If you prefer to use the command line or would like to use scripting or the ~/config/boot/UserBootscript to automate things to join a specific network on bootup, there's the command ifconfig.
Start a Terminal and enter the first line to scan for available wireless networks:
ifconfig /dev/net/iprowifi3945/0 scan
name                             address              signal  auth
haiku-top                        01:d0:19:a6:88:42        30  WPA
ArcorInternet123                 00:20:12:a4:29:e1        15  WPA
The path to your wireless network adapter has to be adjusted, of course.
The output shows the public name (SSID), MAC address, signal strength and authentication method of all found networks.
To join a network, use this line and insert the respective public name (SSID) and password:
ifconfig /dev/net/iprowifi3945/0 join {SSID} {password}
Make sure the initial configuration of the wireless network adapter after booting up has finished, before issuing ifconfig commands or they might be ignored. Depending on your hardware and network configuration that may take a while. Watch those notifications...
Tips
Here is how you get to install your firmware if you don't yet have a working internet connection under Haiku. You download the following files while in another operating system, boot Haiku, copy them to their respective location and invoke the install-wifi-firmwares.sh script.
Copy these two to /boot/system/data/firmware/broadcom43xx/b43-fwcutter/:
- http://www.haiku-files.org/files/wifi-firmwares/b43/fwcutter/b43-fwcutter-012.tar.bz2
- http://cgit.haiku-os.org/haiku/plain/src/system/libroot/posix/glibc/string/byteswap.hCopy this to /boot/system/data/firmware/broadcom43xx/b43-fwcutter/bits:
- http://cgit.haiku-os.org/haiku/plain/src/system/libroot/posix/glibc/include/arch/x86/bits/byteswap.hCopy this to /boot/system/data/firmware/broadcom43xx/:
- http://www.haiku-files.org/files/wifi-firmwares/b43/wl_apsta-3.130.20.0.oCopy this to /boot/system/data/firmware/marvell88w8335/:
- http://www.haiku-files.org/files/wifi-firmwares/marvell/malo-firmware-1.4.tgz
When all those files are in their place, proceed as described above, i.e. open a Terminal and type:
install-wifi-firmwares.sh
Review the licenses and accept them to install all of the now available firmware files.