 Disk İzlencesi
| Masaüstü Çubuğu: | ||
| Konum: | /boot/system/apps/DriveSetup | |
| Ayarlar: | ~/config/settings/DriveSetup |
Disk İzlencesi ile disk bölümleri oluşturabilir, silebilir ve biçimlendirebilirsiniz. Şu anda mevcut bölümleri yeniden boyutlandıramaz veya silemez; bu nedenle bölümlendirilmemiş bir diske (belki bir harici USB bellek veya başka bir sabit disk) veya ilk bölümlendirme işlemini GParted LiveCD gibi başka bir araçla tamamlamanız gerekebilir.

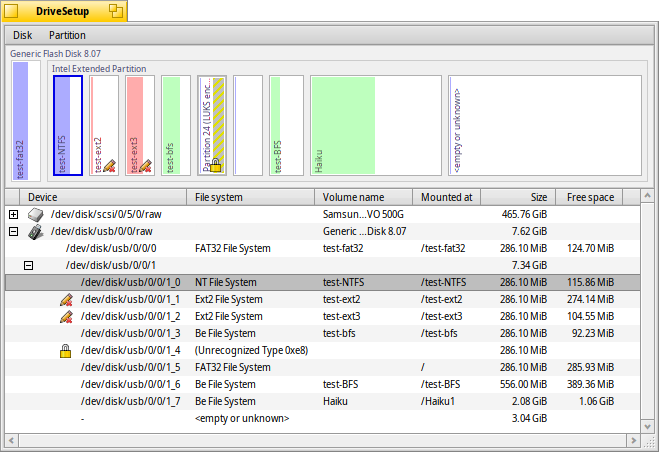
At the top is a graphical representation of all partitions inside the device chosen in the list below it. Each device, by default, can hold a maximum of 4 primary partitions. This limit can be removed by making one of those an extended partition, which in turn can hold theoretically an unlimited number of logical partitions (practical limitations depend on, for example, other OSes installed).
You may have to expand such a list with the +/- widget that appears in that case in front of that device to see the details of every logical partition.
Colors and icons provide some more information about the available volumes and partitions.
Besides the familiar icons for harddisks, CD drives and USB sticks etc., there are a few that indicate a their mount mode:
| /boot bölümü | ||
| Şifrelenmiş bir bölüm | ||
| SMB/NFS üzerinden paylaşılan bir bölüm. | ||
| Saltokunur bağlanmış bir bölüm | ||
| Bağlanmış bir yansı dosyası (ayrıca bkz. diskimage komutu) |
Bağlandığında, renkli bir çubuk bölümün kullanılan alanını belirtir. Renk, bölüm türüne göre değişiklik gösterir:
| BFS ile biçimlendirilmiş bir bölüm | ||
| BFS dışı bir dosya sistemi ile biçimlendirilmiş bir bölüm | ||
| Saltokunur bir bölüm | ||
| Şifrelenmiş bir bölüm |
Sağ tık menüsünden veya menüsünden bir bölümü seçebilir ve çeşitli komutları uygulayabilirsiniz; örneğin / veya .
Aynı zamanda bir bölümü veya toptan işlemlerini yapmanız da olanaklıdır.
 Disk ilklendirme
Eğer daha büyük bir diskin yalnızca bir bölümünü değil de diskin tümünü tek bir bölüm olarak kullanacaksanız öncelikle diski ilklendirmeniz gerekmektedir.
You do this by selecting the raw disk from list of devices and choose a partition map from the menu. The is the right choice for classical booting via a BIOS.
 Yeni bir bölüm oluşturma
When you found unformatted space on a drive, like the above <empty>, you can create a new partition in this space with (ALT C).

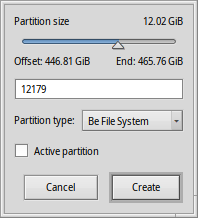
You're prompted with this dialog that lets you adjust the partition size and type. Choose if you want to use the partition for an Haiku installation or if you want to use all the interesting Haiku features with it, like attributes and queries. Note, that other operating systems might not be able to access such a partition.
The checkbox is only available if you have created a primary partition instead of just another logical partition within an extended one. You'll have to tick that checkbox if you plan to use that partition to boot a Haiku installation.
Before you can use, or even mount the newly created partition, it has to be formatted with a filesystem.
 Bir bölümü biçimlendirme
Only unmounted partitions can be formatted by choosing a filesystem from the sub-menu of . The (BFS) is mandatory for a Haiku boot partition and recommended for data partitions to be used with Haiku. Only BFS formatted partitions can be queried and fully support Haiku's file attributes.

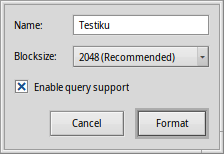
Here you set the name for the partition and its blocksize. The blocksize is the space in bytes that a file will allocate at minimum. 2048 bytes per block are recommended, but you can choose larger or smaller sizes if you have these very specific needs.
If the future data on your partition won't need any querying, you can uncheck to save a bit of overhead for managing the index.