The Tracker is the graphical interface to all your files. It let's you create new files and folders or find, launch or rename as well as copy or delete existing ones.
Being an application like any other (the Desktop with its icons is really just a fullscreen window in the background), Tracker appears with its windows in the Deskbar and can be quit and restarted. The easiest way to quit and restart a crashed or frozen Tracker (or a wayward Deskbar) is to call the Team Monitor.
Mounting Volumes
In order to access a harddisk, CD, USB stick etc., you first have to mount the volume, that is, let the system know it's there. This is done with a right-click on the Desktop or an already mounted volume (like the boot disk) and choosing the volume from the Mount submenu.

There are also Mount Settings so you don't have to mount everything manually after every bootup.
The above settings will mount all disks on bootup that were mounted previously and will automatically mount any storage device you connect/insert.
Warning:
Before you disconnect e.g. a harddrive or USB stick, make sure you have successfully unmounted the volume. This guarantees that all data transfer has finished. Otherwise you may lose data or corrupt the disk!
Navigating
Moving through your folders is one of Trackers main purposes, just like the file managers on other platforms. Haiku's Tracker has some unique features that will help you doing that efficiently.
Instead of double-clicking your way down folder after folder, there's a better way to drill down:

Right-click onto a folder, and at the top of the usual context menu you'll find a submenu of the current folder that let's you navigate down a level. Just move down the hierarchy until you find the file or folder you're looking for and click on it to open it. The above shows the contents of the folder /boot/beos/system/.

Click on the area in the lower left, where the number of items are listed, and you'll get submenus for every level above you current folder. From there you can drill down through the folders as usual.
Note, that the Desktop is always the topmost level as that is where Tracker shows mounted volumes. So, if you want to go to another disk, you first have to navigate to the top (Desktop) and cross over to your other disk from there.
You'll get the same submenu-navigating when you drag a file over a folder. After a short while of hovering, a submenu pops up and you can drill down to your destination. If you initiated the drag with the right mousebutton, you can choose between copying, moving or linking the file when you release the mouse.
By default, when you double-click a folder, Tracker opens a new window while leaving the parent window open. This can quickly lead to an overcrowded desktop.
You can prevent that by holding down the left WIN key, which automatically closes the parent window.
This is also true for keyboard navigation. For more on that, see topic Shortcuts and key combinations.
Appearance
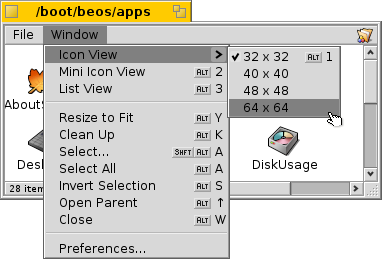
Tracker windows offer three different viewing modes from the Window menu:
- Icon View (ALT+1) - Big icons, you can change the size from the submenu.
- Mini Icon View (ALT+2) - Small icons.
- List View (ALT+3) - A detailed list of your files enabling you to show/hide available attributes. (See topic Attributes.)
The Window menu offers a number of other functions:
- Resize Window (ALT+Y) - Resizes the window to its ideal size.
- Clean Up (ALT+K) - Aligns all icons to an invisible grid. Hold down SHIFT and the menu becomes Clean Up All which additionally sorts all icons alphabetically.
- Select... (SHIFT+ALT+A) - Select files according to a regular expression.
The rest of the functions are pretty self-explanatory, leaving the Tracker preferences.
Tracker preferences
Window | Preferences... opens a panel that offers a number of setting that, where not obvious, should become clear once tried out. Since all settings are applied live, you'll immediately see the changes.
So, in short, the not so obvious settings:
- Desktop - Decide if all mounted disks appear directly on the Desktop or in a window after clicking a single Disk icon sitting on the Desktop.
- Windows - You can set Single Window Navigation, i.e. a double-clicked folder doesn't open in its own window, but inside the already open window instead, replacing the view of it's parent folder. This is not the same as clicking while holding the WIN key, as described above, because you'll lose the per window saved position and size.
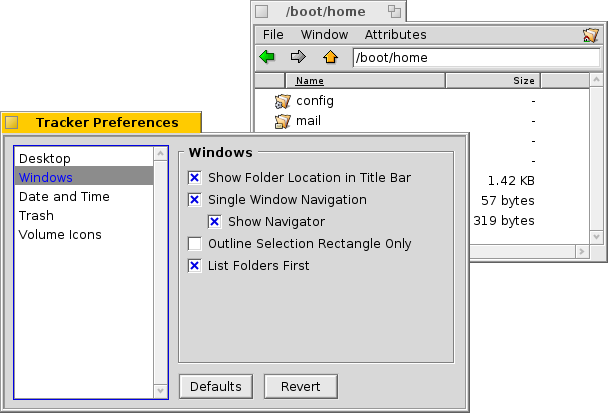
Before you switch Tracker to Single Window Navigation mode, because that may feel more familiar to you, we recommend giving the menu based browsing a try first, as that may actually work much faster for you after getting used to. On the other hand, single window browsing offers a Navigator where you can enter or copy&paste a path name and use back, forward and up buttons.
- Date and Time - Set date and time formats.
- Trash - Set the behaviour when deleting a file.
- Volume Icons - Set the colour of an optional indicator of free space that's shown besides a disk's icon.
Working with files
When invoked on a selected file, most of the File menu commands are also offered in the context menu by right-clicking that file.
As usual the usage of the commands is pretty clear.
- Find... - Find a file or folder. See topic Query for more info.
- New... - Create a new folder or any other file based on a template.

Choosing Edit Templates... opens the folder /boot/home/config/settings/Tracker/Tracker New Templates. Creating a file in that folder will offer its filetype with the file's name and other attributes as template in the New... menu. Here, there's a file "Text" with the filetype text/plain. See topic Filetypes for more info.
- Open With... - A submenu offers all applications that can handle this filetype.
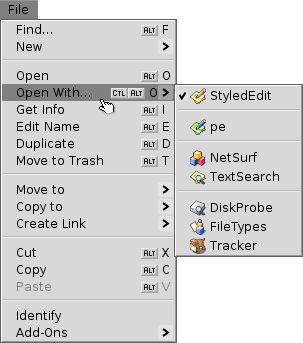
The preferred application that would open the file when double-clicked, is checkmarked. This submenu lists first those applications that can handle the exact filetype, in this case it's a text file, the type text/plain. Next come all applications that can handle that supertype in general, here text/*. Last in the list are those that can deal with any file. If you don't click on an app in the submenu, but on the Open With... entry instead, a panel opens:

Here you'll again find the programs that were listed in the submenu. By selecting one and clicking the Open and Make Preferred button, you changed the preferred application for every file of that filetype, here text/plain.
- Get Info
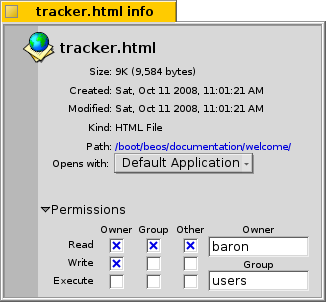
The panel presents info on the selected file and lets you set the default application and, after you expanded that part of the panel, permissions and owner. Clicking on the path will open it in a Tracker window.
- Edit Name, Duplicate and Move to Trash - lets you rename or duplicate a file or put the selected file(s) to the trash.
- Move to, Copy to and Create Link - lets you move, copy or link the selected file(s) using the submenu navigating method. Holding SHIFT while invoking the menu offers the option to create a relative link.
- Cut, Copy and Paste - lets you cut, copy and paste files using the clipboard. By holding SHIFT while invoking the menu you can Copy/Cut more files, maybe from another folder that you can paste somewhere else later. Also, while holding SHIFT you can paste the copied files in the clipboard as links.
- Identify - will sniff out and set the type of a file if it didn't have one before, e.g. if you transferred a file with wget which doesn't set a filetype itself. Holding SHIFT while invoking the menu changes the item to identify the filetype and correct it if it was false before.
- Add-Ons - offers you every generic Tracker add-on and those that can handle the selected file(s). See topic Tracker Add-ons for more information.
Transaction status
When you copy, move or delete files, Tracker shows its progress with a status window. If you initiate more than one transaction, each job gets its own status display.
To the right are two buttons to pause or stop a transaction entirely. Sometimes it can be useful to temporarily pause a large transaction. For example, you may need to quickly launch a large application. Copying large amounts of data chokes your harddisk's IO bandwidth and thus delays your workflow.